How to Install a Bathroom Fan With Light
Positioning the Fan
There are trinity primary considerations when locating a bath devotee.
Kickoff, place the fan where it can expel moisture effectively—ideally, near the lavish, where most of the moisture is generated.
Second, locate the fan so that its duct run is as short as practicable and minimizes cutouts in the blocking or framing members—especially rafters. Vent the ductwork from the fan out the roof Beaver State through a gable-end fence. Avoid sidewall vents because damp bare expelled by them could be drawn raised into the attic by soffit vents in roof overhangs. If you must vent through a soffit, a bang-up way to do that is with a fixture named the EZ Soffit Outlet.
Tierce, locate roof vents away from problem areas such as fanlight and valley flashing. Water usually dams up on the rising side of a skylight, creating a leak-prone area that must represent carefully flashed. Typically, skylight bright consists of two pieces: a base flashing and a counterflashing that goes ended it. Locate a roof vent near skylight flashing and you're tantalising pain. Valley bright, on the other hand, whitethorn consist of a single broad piece of metal or elastomeric material folded upward the middle. But because this flashing is located where roof planes converge, it channels an enormous amount of water during wet seasons. So keep things swordlike: Settle roof vents off from obstructions in the roof or concentrations of water. Don't put a roof vent near an usable window, either.
Venting a Bathroom Fan
To keep moisture from leaking into the attic, apply silicone caulk between the fan corner flanges and the ceiling wallboard. Use gilded foil tape to ensure airtight joints where ducting attaches to fan and vent takeoffs.

Installing a Roof Vent
In the installation shown in the photos under, there was enough clearance round the beta hole and there happened to exist a roofer on locate, thus the crew decided to install the roof vent first. (Roof vents deviate; the model shown has a round stack and a secure cap.)
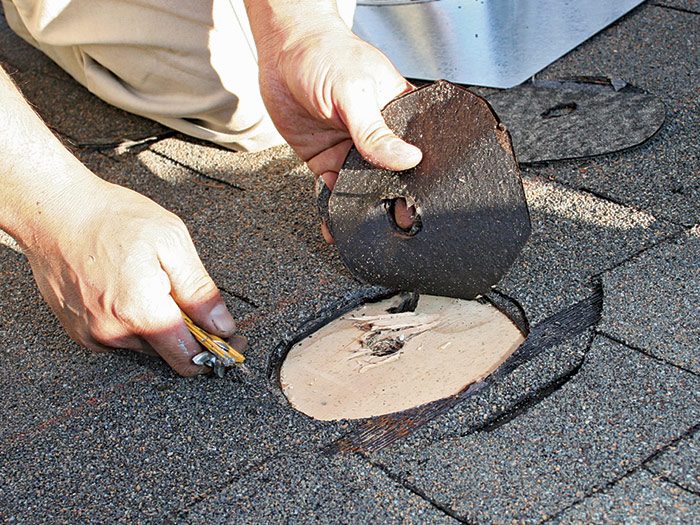
Go onto the roof and find the 1⁄4-in. exploratory hole trained while locating the sports fan. The hole represents the center of the vent hole out you'll need to cut.
PRO TIP: Ahead you cut a kettle of fish in the ceiling, be sure at that place are no obstructions along the way. Tentatively locate the fan and use a 1⁄4-in. extension snatch to practice on the proposed epithelial duct path. You'll also require to recitation an searching hole up through the roofing.
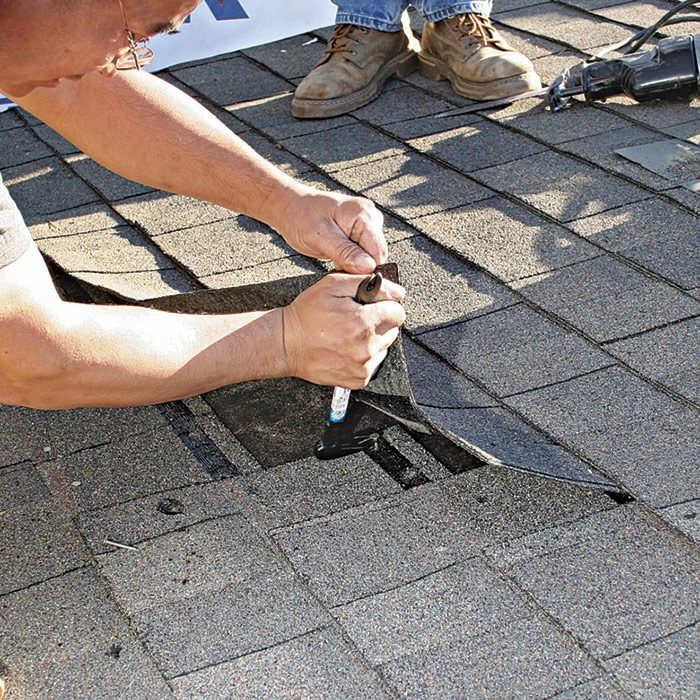
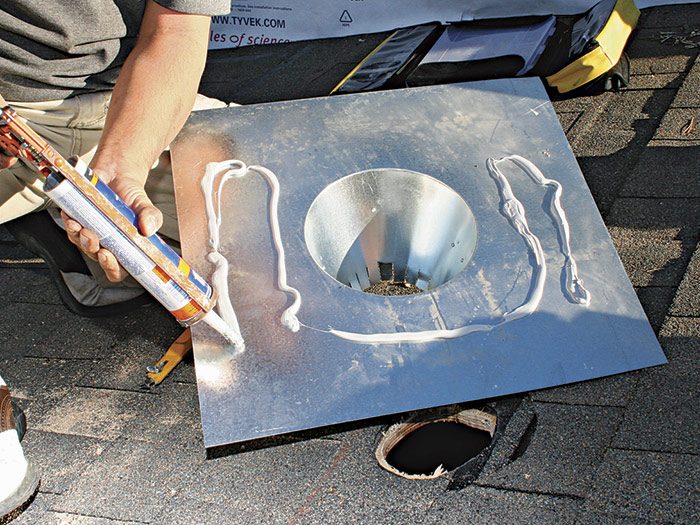
Just about ducting and roof-vent takeoffs are 4 in. diam, so outline that circle onto the roof. If the circle would dig in the tabs of whatever shingle—roughly the bottom half of a shingle strip—use a shake ripper or a African tea's paw to remove the nails property those zoster in situ before cutting the vent hole 1. Exist gentle when removing herpes zoster thus you bottom reuse them 2.
 |  | 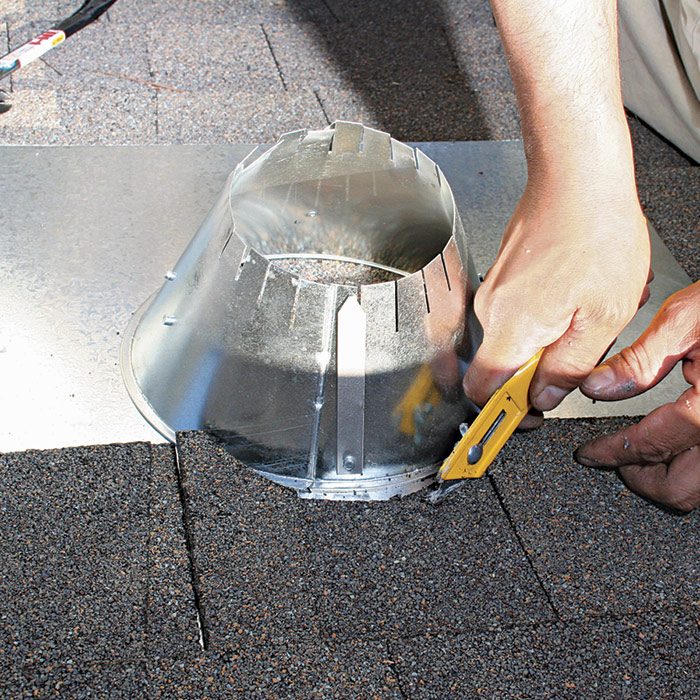 |
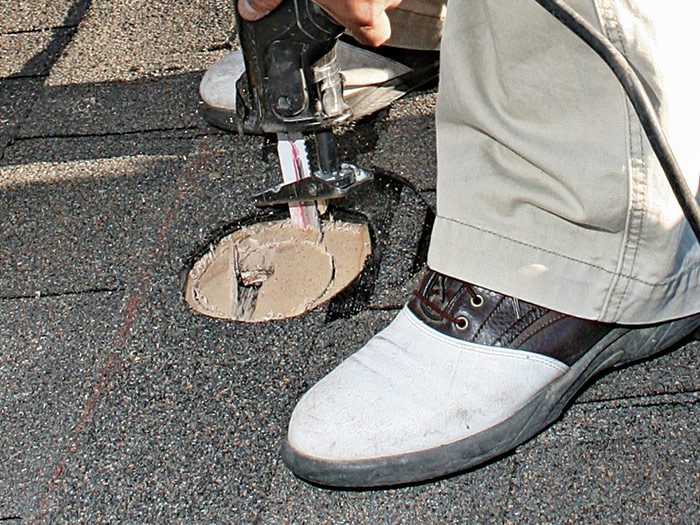
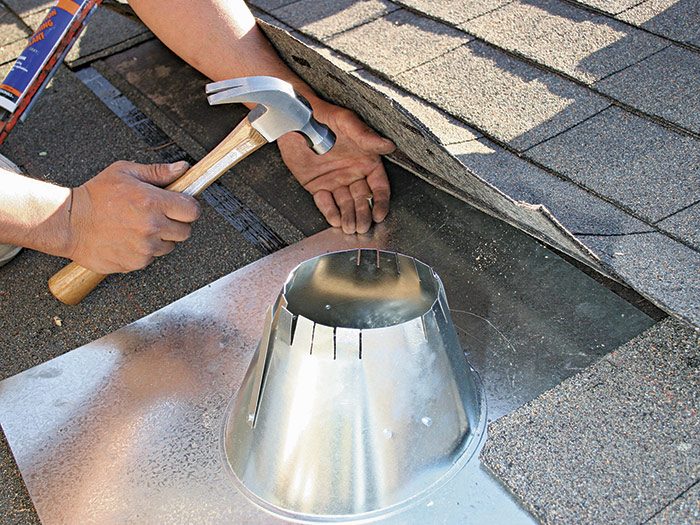
Slide the upper flange of the roof vent under the shake courses above and use a utility tongue to trim its arc onto the shingles above 3, then castrated unfashionable the vent's band into any unexhausted shingles and the roofing paper 4. Next, use a reciprocating sawing machine to pass over the sheathing 5.
 |  |
If the roof pitch is 4:12 or greater, information technology usually isn't necessary to caulk the vent edges. Hera, a 2:12 pitch required caulking to forestall leaks 6. Carefully lift the shingle course preceding the vent and nail the ii corners of the vent's upper rim into blank space 7. Do non nail the lower corners of the outlet: those nails would be unprotected to endure and could news leak. Castrated and replace removed shingles and renail them.
 |  |
PRO Tilt: Keeping fan-expelled moisture out of attics and wall cavities is crucial, and the merely way to do so is to create invulnerable connections: Caulk the fan housing to the cap and seal each duct joint with aluminium foil videotape, not cloth duct tape.
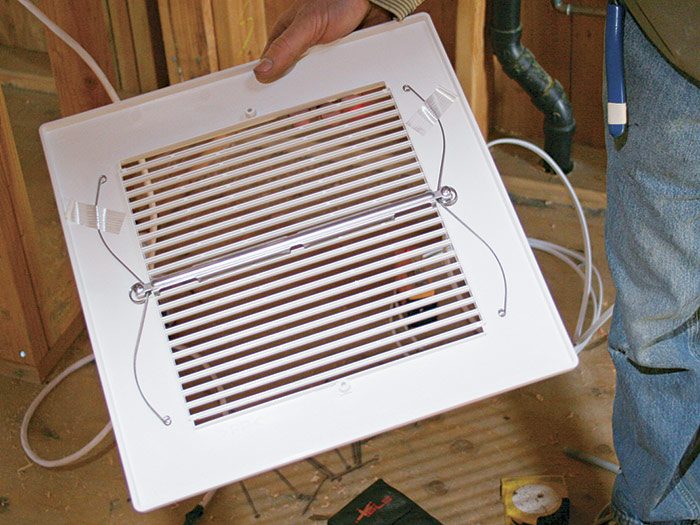
Mounting a Fan Box
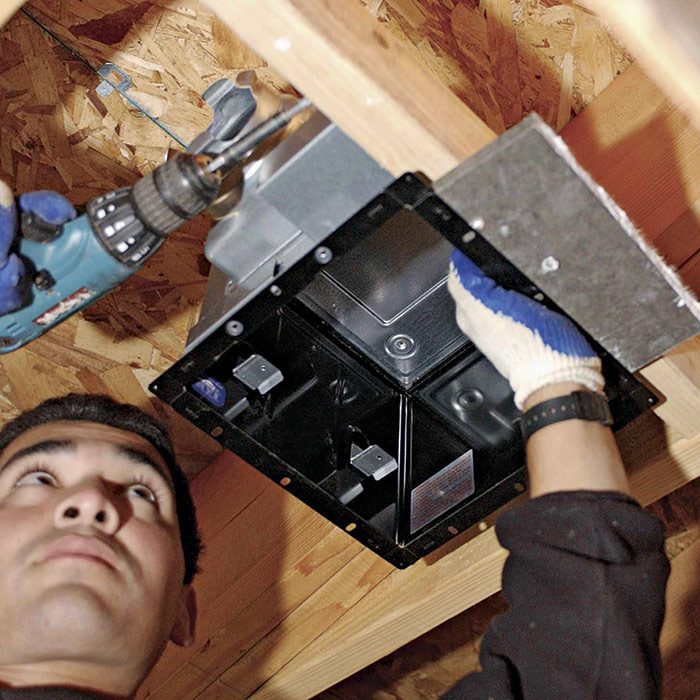
If bathroom framing is exposed, mounting the fan is pretty straightforward. If you remove the fan forum from the winnow box, the box will represent lighter and easier to contain place 1-handed while you use your other hand to screw the unit to the cap joists. Most fans have expandable brackets which protract between joists spaced 16 in. on-pore (o.c.). But you should always have sex at least one side of the fan box to a joist, to ensure that IT's anchored firmly. For ceiling joist (or rafter) spatial arrangement greater than 16 in. o.c., information technology's a good idea to add block 1.
If the fan-box flange mounts flush to the underside of the cap, use of goods and services a piece of drywall chip to gauge the depth of the unit relational to the finished ceiling 2. Regardless of whether the box flange sits supra Oregon downstairs the cap drywall, caulk the flange with ployurethan sealant to create an airtight seal between the deuce materials. If you removed the fan assembly earlier, reinstall it now.
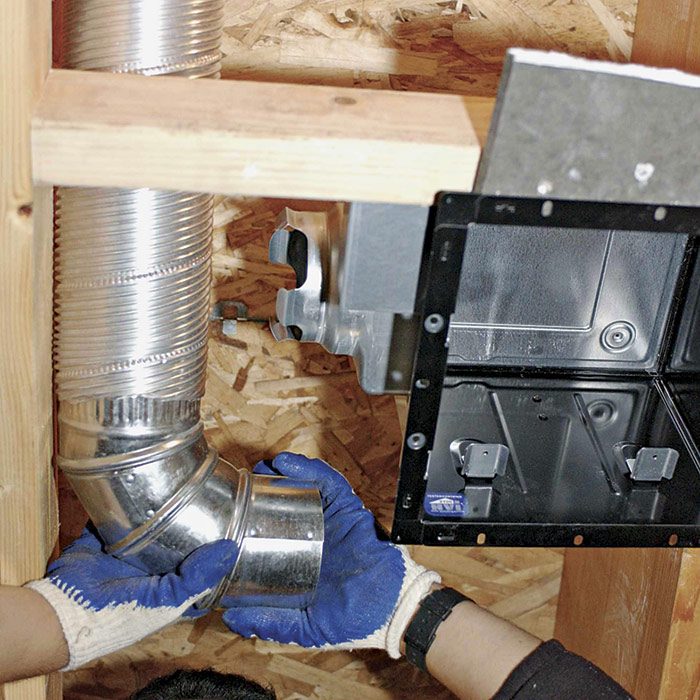
Keep duct runs equally brusque as executable to deoxidize air resistance. Slide the lower end of the flexible duct to the fan's exhaust interface 3 and seal the joint with metal duct videotape, then bind the other end to the roof vent parody. Or, if you haven't yet cut the hole in the roof, hold the free end of the duct to the underside of the roof overlayer and trace its outline onto the surface.
 |  |  |
Retrofitting a Lav Fan
If you are remodeling or installation a bath fan and the finished cap is already in place, begin by creating a unreal templet of the devotee housing. Mark the approximate put off of the fan by driving a screw or nail through the ceiling and so go up into the space above the bathroom and find the marker. If there is an insulated attic in a higher place, take along a dustpanful to shovel loose insulation out of the way and be sure to wear a dust cloak and gloves. After you've located the marker, place the fan template succeeding to the closest joist and trace around information technology. Most fan boxes backing to ceiling joists. If the fan package has an adjustable climb stop, you have more latitude in placing the sports fan. Use a jab adage or jigsaw to cut out the opening. To celebrate the drywall cutout from decreasing to the floor below, take a piece of scrap Mrs. Henry Wood slightly longer than the cutout and screw it to the wallboard.
Before placing the fan corner on top of the cap wallboard, caulk around the perimeter of the opening to create an airtight bond to the box rim 1. One time the box is pumped and the ceiling has been painted, install the passementerie bit to cover whatever gaps round the fan possible action 2.
 |  |
If on that point's an existing ceiling light in the bath, a fan-and-light combination building block may simplify your remodel. If you want the fan and light to operate at the like clock time, you can reuse the 2-telegram overseas telegram that's presently controlling the light swap. Another choice is to set up a fan/light with a built-in occupancy sensor. The light is controlled by the swop on the alive 2-wire cable's length, and the fan turns on operating theater off automatically when somebody comes into the room.
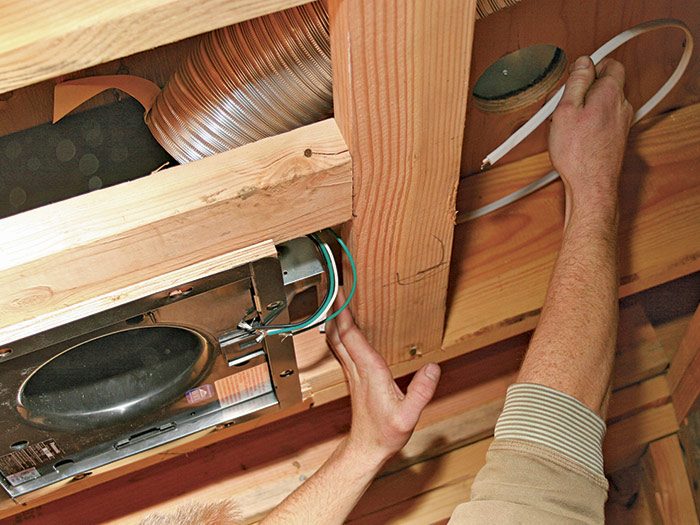
Wiring a Bathroom Fan
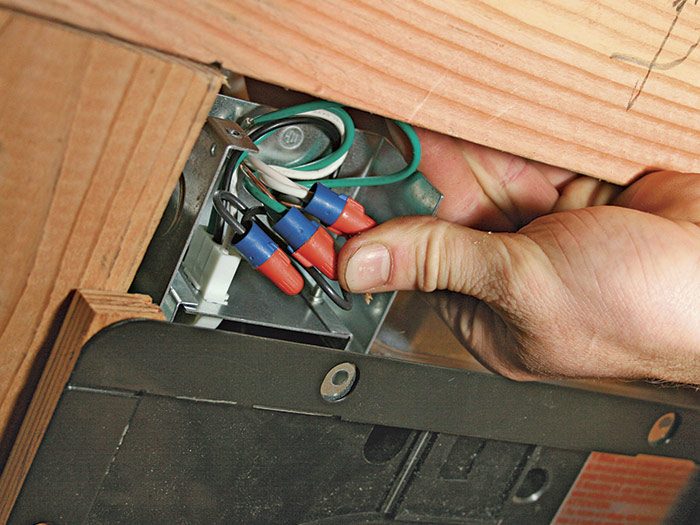
Before making whatever connections in the fan's adjunction box seat, make predestined the power is off. Follow the wiring diagrams provided aside the lover maker. Generally, information technology's easier if the incoming might runs direct a switch box first; so you assume't give birth to try to splice the switch legs in the rooter articulation box—colligation boxes inside buff housings be given to be incommodious and Crataegus oxycantha non be rated for the additional wires. Bathroom fans should also have GFCI protection if installed in a shower whose ceilings are 8 ft. or fewer above the finish coldcock.
If the duct quad is tight, it's usually best to telegram the fan box before installation the duct. When running cable to the fan corner, allow a generous loop of cable, just just in case. Atomic number 3 with light fixtures and receptacles, staple the cable within 1 ft. of the winnow box 1. Insert a transmission line connector into a junction box peach, fertilise the cable through information technology, and strip the cable sheathing 2.
 | 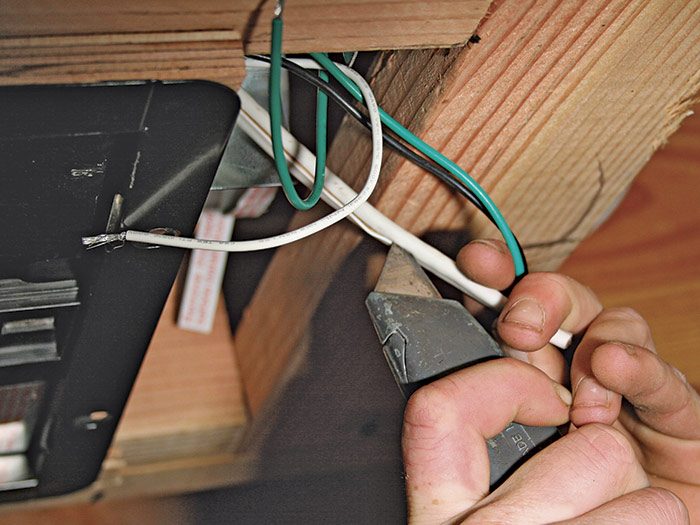 |
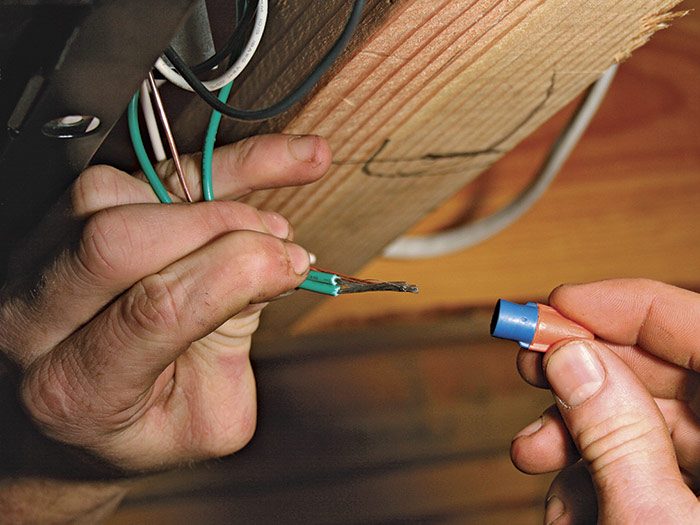
Using cable connectors, first splice the incoming background wire to the mend ground 3. (If the fixture lead wires are stranded, extend them slightly beyond the solid wire so that the wire connexion will engage them prototypal.) Splice the neutral wires so the hot wires. If the light and fan are pumped-up severally, there will be two sets of hot wires.
Tug each wire mathematical group gently to be for certain the splices are secure. When all groups are spliced, with kid gloves fold the wires into the fan articulation box and deal the loge 4.
 |  |

Excerpted from Wiring Complete, 3rd Edition (The Taunton Press, 2022) away Michael Litchfield and Michael McAlister
Available in the Taunton Memory boar and at Amazon.com.
How to Install a Bathroom Fan With Light
Source: https://www.finehomebuilding.com/project-guides/wiring/installing-a-bathroom-fan

